Simulation WSN!
WSN comuniication!

Description
I discovered Wouter Bulten's work on SLACTest for simulating networks. In this post, I will explain his work a little. In this simulation, worldwide scenario: a fixed world without obstructions that houses a collection of nodes. Nodes: (such as Access Points or APs), and Users are in motion. All nodes are randomly positioned within the world’s boundaries, and all moving nodes start with random positions.
Simple Explanation:
- Nodes
- The Node class stores the current position of a node and calculates the distance between nodes. - The MovingNode class represents a node that can move, tracking all previous positions. It requires the implementation of a move method. The moveToPosition method moves the node to the given coordinates and updates the trace of its previous positions. - The BouncingNode class represents a node that bounces within a box, with movement determined by its rotation (radial direction) and speed.
- Network
- The WirelessEntity class, an abstract base class, represents a wireless entity in a network with properties such as transmitting power and a signal propagation constant. It calculates signal strength using an RSSI function based on distance, signal propagation constant, transmitting power, and noise level. - The FixedAP class, a subclass of WirelessEntity and Node, represents a stationary access point with specific transmit power and signal strength. - The MovingAP class, a subclass of WirelessEntity and BouncingNode, represents a moving access point in a wireless network.
- Simulation
- The Controller class controls iterations and handles output. The iterate method increments the iteration count and outputs a message. - The NetworkController class, extending the Controller class, manages a network simulation. It initializes all nodes with random positions and movements. The iterate method iterates over all nodes, calling their iterate methods, and also invokes the iterate method of the parent Controller class, the NetworkController class is responsible for initializing and updating nodes in a network simulation.
Conclusion
I explain the most remarkable parts of that code and suggest adding a container to improve the project. Additionally, I find the work of Wouter Bulten on SLACTest very valuable
GitHub: https://github.com/wouterbulten/SLACTest
Lastly
Believe in yourself.🧑🏻🎤
Zigbee and Z-wave!
Protocols for WSN comuniication
Description
These protocols enabling devices to communicate with each other.
Introducing the Zigbee
Zigbee is an IEEE 802.15.4-based specification designed for creating personal area networks with small, low-power digital radios. It’s commonly used in home automation, medical device data collection, and other applications that require low-power and low-bandwidth communication.
Introducing the Z-wave
Z-Wave is a wireless communication protocol primarily used for residential and commercial building automation. It operates as a mesh network using low-energy radio waves, enabling seamless device-to-device communication and control over various smart home devices.
Diferencess
Z-Wave and Zigbee each has its own unique characteristics.
Z-wave
- Communication: Reliable via mesh network. - Frequency Band: Uses the less congested 900 MHz band.
Zigbee
- Communication: Longer range, potential for network congestion. Frequency Band: Operates in the crowded 2.4 GHz band.
Conclusion
I learned a bit about those two protocols and their differences. I chose not to mention the cost, as it varies dynamically, as well as the types of devices that use these protocols.
Lastly
Do not stop to be curios.🧑🏻🎤
Esp32 and MQTT!
IoT Weather Monitoring
Description
The ESP32 microcontroller and the DHT22 sensor are a dynamic duo, i learn about weather monitoring applications. This article delves into their interaction and integration, shedding light on how they work together to collect and transmit weather data effectively.
Understanding the ESP32 Microcontroller
I blogged about this before in my latest post, please check it.
Introducing the DHT22 Sensor
The DHT22 sensor, also known as the DHT22 or AM2302, is a high-precision sensor capable of measuring both temperature and humidity. Its digital output provides accurate readings with minimal calibration required. The sensor operates on a single-wire communication protocol, making it easy to integrate into microcontroller-based projects. The DHT22 sensor is well-suited for weather monitoring applications.
Interaction between ESP32 and DHT22 Sensor
The ESP32 and DHT22 sensor interact seamlessly to collect weather data and transmit it to a central system for analysis and visualization. Here’s how their interaction typically unfolds:
- Initialization: The ESP32 initializes communication with the DHT22 sensor by configuring the appropriate GPIO pins for data exchange. - Data Acquisition: The ESP32 triggers the DHT22 sensor to start measuring temperature and humidity. The sensor converts these measurements into digital signals and transmits them back to the ESP32. - Data Processing: Upon receiving the data from the DHT22 sensor, the ESP32 processes it to extract temperature and humidity values. It may perform additional calculations or filtering to ensure data accuracy. - Transmission: Once the data is processed, the ESP32 transmits it to a designated endpoint, such as a cloud server or a local display unit. This transmission can occur via Wi-Fi or Bluetooth, leveraging the ESP32's built-in connectivity options. - Visualization and Analysis: I use the serial console to print the values.
Integration of ESP32 and DHT22 Sensor
Here’s a brief overview of the integration process:
- Hardware Setup: Connect the DHT22 sensor to the ESP32 microcontroller using appropriate GPIO pins. - Software Configuration: Write code for the ESP32 microcontroller to initialize communication with the DHT22 sensor and read data from it.
Conclusion
This is a beginner personal project, the ESP32-DHT22 can provide a versatile platform for building innovative projects.
GitLab Project
link: https://gitlab.com/-/ide/project/esp32_esp8266/esp32_mqtt
Lastly
I love to learn few of my Esp32 🖍️
Esp32 Solar Energy 💥!
Interesting points
Description
Home automation is a very exciting topic that I am currently learning about. I am particularly interested in the monitoring aspect, as it is crucial for the effectiveness and reliability of any system.
IoT-Based Solar Power Monitoring System with ESP32
The monitoring of performance of solar power systems becomes interesting. An IoT-based solar power monitoring system can provide real-time data and insights into the functioning of a solar panel setup.
This article explores the integration of various components, including the ESP32 microcontroller, voltage sensor module, LM35 temperature sensor, and LDR (Light Dependent Resistor), to create an efficient solar power monitoring system.
ESP32 Microcontroller
The ESP32 is a powerful and versatile microcontroller. In this project, the ESP32 serves as the central unit, collecting data from different sensors, processing it, and transmitting it to a ThingthingSpeak. Its low power consumption and ability to enter deep sleep modes make it ideal for solar-powered applications, ensuring minimal energy usage.
Voltage Sensor Module
The voltage sensor module is used to measure the voltage output from the solar panels. This module typically consists of a voltage divider circuit that steps down the high voltage from the solar panels to a lower, manageable level that the ESP32 can safely read. The voltage sensor provides real-time data on the panel’s output, which is crucial for assessing the performance and efficiency of the solar power system.
Integration: The voltage sensor module is connected to one of the analog input pins of the ESP32. The ESP32 reads the analog voltage value, converts it to the actual voltage.
LM35 Temperature Sensor
- The LM35 is a precision temperature sensor. In a solar power monitoring system, the LM35 can monitor the temperature of the solar panels, as excessive heat can affect their efficiency and lifespan.
Integration: The LM35 is connected to another analog input pin on the ESP32. The ESP32 reads the analog voltage from the LM35, converts it to a temperature value using the sensor’s specifications, and includes this data in the monitoring system.
LDR (Light Dependent Resistor)
- An LDR is a resistor whose resistance changes with the intensity of light falling on it. This information helps in analyzing the correlation between light intensity and the solar panel’s output, and can also be used to adjust the position of the panels for maximum efficiency (if used in a solar tracking system).
Integration: The LDR is connected to another analog input pin on the ESP32. The resistance of the LDR changes with the light intensity, affecting the voltage at the analog input pin. The ESP32 reads this voltage, converts it to a light intensity value, and uses this data to analyze the performance of the solar panels under different lighting conditions.
Conclusion
By integrating the ESP32 with a voltage sensor module, LM35 temperature sensor, and LDR, we can create a comprehensive IoT-based solar power monitoring system. The ESP32 collects data from all these sensors, processes it, and transmits it for real-time monitoring.
Link code of the project: https://gitlab.com/esp32_esp8266/solarpowemonitoringsystem
Lastly
I love to learn Esp32 and monitoring 🖍️
Esp32!
Interesting review
Description
I want to share some insights about the ESP32, its advantages, and the integrated modules that make it suitable for various projects. I'll also discuss a few of its applications. Previously, I used the ESP8266, which involved a lot of trial and error, and it was relatively more expensive. However, the ESP32 offers a more robust and cost-effective solution with enhanced features and ease of use.
ESP32: A Versatile Microcontroller for Wireless Sensor Networks
The ESP32 is a low-cost, low-power system on a chip (SoC) microcontroller developed by Espressif Systems. Launched in 2016, it has become a popular choice for a wide range of applications due to its robust features and versatility, especially in wireless sensor networks (WSNs).
History
The ESP32 is the successor to the highly successful ESP8266, which was launched in 2014. The ESP8266 was revolutionary in making Wi-Fi connectivity affordable and accessible for IoT projects. Building on this success, Espressif Systems introduced the ESP32 to provide more processing power, additional features, and improved performance. The ESP32 comes equipped with dual-core Xtensa LX6 microprocessors, integrated Wi-Fi, and Bluetooth capabilities, which significantly broaden its application scope compared to its predecessor.
Advantages
-
Integrated Wi-Fi and Bluetooth: The ESP32 supports both Wi-Fi and Bluetooth (including BLE), making it ideal for various wireless communication tasks. This dual connectivity enhances its flexibility and functionality in different scenarios.
-
Low Power Consumption: The ESP32 is designed with multiple power modes, including deep sleep and light sleep, which are essential for battery-operated devices. These modes help in reducing power consumption significantly, which is a crucial factor in WSNs.
-
High Performance: With dual-core processors and a clock speed of up to 240 MHz, the ESP32 can handle complex tasks efficiently. It also supports a wide range of peripherals such as ADCs, DACs, UART, SPI, I2C, and more, which makes it a powerful microcontroller for various applications.
-
Cost-Effective: Despite its advanced features, the ESP32 remains affordable, which is a significant advantage for large-scale deployments in WSNs.
-
Robust Community and Support: The ESP32 has a strong community and extensive documentation. This support network makes development easier and faster, providing numerous libraries and examples.
Disadvantages
- Overhead for Simple Tasks: For very simple tasks or projects where advanced features are not required, the ESP32 might be overkill. In such cases, simpler microcontrollers like the ESP8266 or Arduino might be more appropriate.
Use in Wireless Sensor Networks (WSNs)
WSNs are networks of spatially distributed sensors that monitor and record environmental conditions. These networks rely on effective communication and power management, making the ESP32 an excellent fit.
-
Environmental Monitoring: The ESP32 can be used in WSNs for real-time environmental monitoring, such as temperature, humidity, and air quality measurements. Its built-in Wi-Fi and Bluetooth allow seamless data transmission to central servers or cloud platforms.
-
Home Automation: The ESP32 is also widely used in smart home systems. It can control and monitor various home appliances, lights, and security systems, providing a convenient and energy-efficient home environment.
Conclusion
In conclusion, the ESP32’s blend of advanced features, low cost, and robust performance makes it a versatile microcontroller suitable for a wide range of applications, particularly in wireless sensor networks. Its ability to handle both Wi-Fi and Bluetooth communications, along with its low power consumption, positions it as a cornerstone for the development of smart, connected solutions in various fields.
Lastly
Esp32 is like falling in love 🖍️
UART Communication
Connecting Devices Simplified
Description
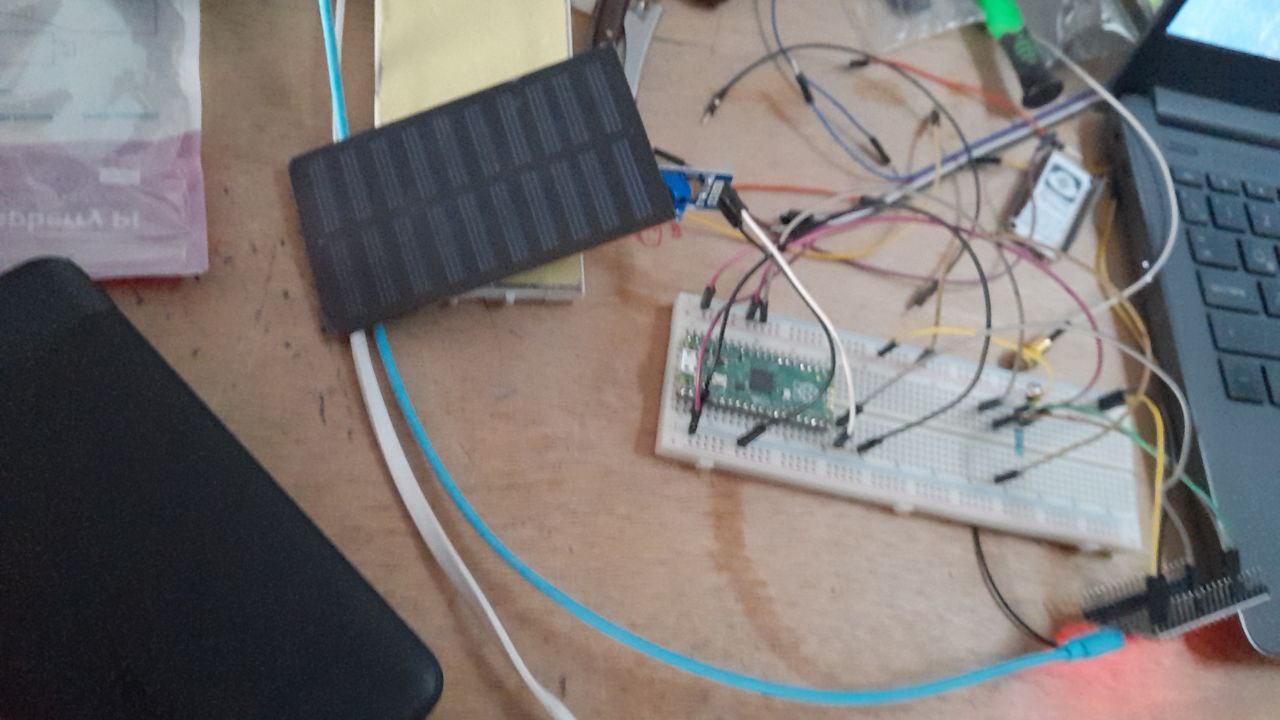
Curious to learn more about data transmission protocols, I performed UART/serial communication between two ESP32 boards using the UART hardware library of the Arduino IDE. I debugged this using 2 esp32 and a LED. The serial port, known as Universal Asynchronous Receiver/Transmitter (UART) Communication, is widely used for most sensors and systems. To share workload, information, and perform various tasks, communication between two ESP32 boards is sometimes necessary.
Hadware
- 330 ohm resistor - 2 ESP32 boards - Protoboard - Wires
Steps:
Follow the provided sketch and diagram.
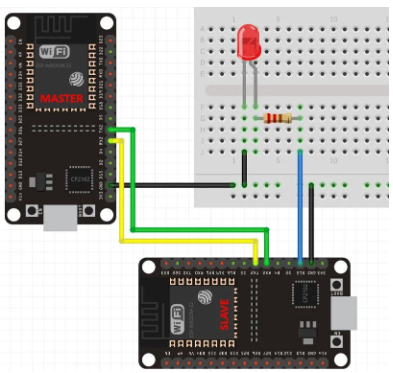
We only transmit a single character (1 or 0). However, you can extend this to send longer messages. This is the result of this project.

Conclusion:
This project is an excellent starting point for learning the basics of communication. There are other protocols, such as I2C and SPI, which I discussed in a podcast. Here is the link: 🫴 The shorcut podcast
Lastly
Never give up your dreams…
Is synthetic!
Introducing LittleFS
Description
1. What is an Automotive Bus System? In this article, we provide a brief description of synthetic data, highlighting two important points: why synthetic data is valuable and what the future holds for synthetic data.
- Why Choose Synthetic Data?
Service providers gain significant benefits from accessing individual-level data safeguarded by governments or organizations. However, releasing more granular (disaggregated) data to the public risks exposing individuals represented in that data to privacy violations. This risk has been exacerbated by increased computing power and the development of powerful new statistical methods.
Data curators, the guardians of an organization’s data, must navigate these heightened risks when deciding which datasets or statistics to release publicly. They must also determine how to obscure private information before these releases, often referred to as anonymizing the data to not compromising personal privacy.
Data synthesis offers a robust solution. This statistical technique allows data curators to release record-level data while maintaining privacy protections, much like creating a convincing replica of a priceless artifact. Stakeholders can explore and benefit from this synthetic data, obtaining the information they need without jeopardizing individual privacy.
Stronge privacy
Imagine synthetic data as a photograph; it can be a partial snapshot or a complete picture.
Synthetic data can be either partially or fully synthetic. Partially synthetic data synthesizes only some columns of a dataset, typically the most sensitive ones from a privacy perspective.
Fully synthetic data offers stronger privacy protections than partially synthetic data, but preserving the dataset’s properties becomes more challenging in the full synthesis process.
GANS
According to the paper “Data Generation of Time-Series Medical Records” by the University of Applied ciences Hamm-Lippstadt, Germany.
State-of-the-art GAN-based models for synthetic data generation to generate time-series synthetic medical records of dementia patients which can be distributed without privacy concerns.
Some research adds valuable insights into synthetic data using Generative Adversarial Networks (GANs).
Generating synthetic data depends on the type of data you want to create. I used the SDV library to generate synthetic data for the Iris dataset.
- The Future of Synthetic Data?
In my opinion, a particularly relevant and recent shift in disclosure limitation practice among some statistical agencies is the desire to formalize privacy and confidentiality (P&C) mathematically. This shift is evident in the invention of differential privacy and its variants.
Lastly
I love to share few of my knowledge 🖍️
A Car's Conversation!
Their ability to communicate is remarkable
Description
1. What is an Automotive Bus System? Automotive bus systems are communication networks that enable various electronic components within a vehicle to exchange information efficiently. Now we know a little😁 These systems play a crucial role in modern automotive design by reducing the complexity and weight of wiring harnesses and enhancing the vehicle's overall functionality and reliability. Cars are differents than before 💥 Automotive bus systems facilitate real-time data transfer and ensure that critical systems, such as engine control units, sensors, and safety features, can operate seamlessly and cohesively.
LIN (Local Area Network)
-
A serial communication standard for local area networks (LANs).
-
Used in computers, IoT devices, and other electronic equipment.
-
Provides a single, dedicated path for data exchange between devices on the network.
score: ⭐⭐
CAN (Controller Area Network)
-
A high-speed serial bus specifically designed for automotive applications.
-
Used in vehicles, industrial machinery, and other automotive systems.
-
Offers real-time communication and data exchange between connected components.
score: ⭐⭐⭐
FlexRay
-
A high-speed serial bus standard that supports multiple data rates and multiple devices.
-
Used in a wide range of applications, including automotive, aerospace, and telecommunications.
-
Provides flexible and efficient data exchange capabilities.
score: ⭐⭐⭐
MOST (Multipurpose Serial Tramway)
-
A widely used serial communication bus that supports multiple data rates.
-
Used in a variety of devices, including computers, medical equipment, and industrial control systems.
-
Provides a reliable and efficient communication channel for multiple devices.
score: ⭐⭐⭐
Lastly
I can’t deny to try new things.
I can’t deny to love Open Source.
Doors!
Ways to connect remotly
Description
This post is incomplete please move to another, i forgot what i wanted to write
Requirements
- Tailscale
Getting Started
-
Port Forwarding
- Redireccion de Puertos
-
Aplicaciones Port Forwarding
-
Remote SSH
-
Tailscale
-
-
Materiales
-
Raspberry
-
Local Machine
-
Nota Instalar tailscale en ambos.
Setup
Raspberry
tailscale up  # promt a url
tailscale status
copia el url
Local Machine
- Pega el url en el browser.
Lastly
I like to try new things I love Open Source.
Self-Hosting Your Music Player!
Empower Your Music Experience
Description
In today's digital age, music is more accessible than ever before. With streaming services and online music platforms dominating the industry, we often rely on third-party providers to enjoy our favorite tunes. But what if I told you there's a way to take full control of your music library and listening experience? Enter self-hosted music players – the ultimate solution for music enthusiasts who crave independence and customization.
Requirements
- Docker
- Nfs
Improved versions: Tailscale
Getting Started with Self-Hosting
self-hosting platform
- Jellyfin
We choose Jellyfin the docker image that we build taking into account that some parts of the dockerfile need to be configured.
version: '3.5'
services:
  jellyfin:
    image: jellyfin/jellyfin
    container_name: jellyfin
    user: 1000:1000 # User perimsion
    network_mode: 'host' #
    volumes:
      - ./folder/config:/config
      - ./folder/cache:/cache
      - ./folder/media:/media
      - ./folder/media2:/media2:ro #importante
    restart: 'unless-stopped'
    environment:
      - JELLYFIN_PublishedServerUrl=http://example.com #
    extra_hosts:
      - "host.docker.internal:host-gateway" #
user: This field specifies the username or UID (User ID) to use when running the container.network_mode: When you set the network mode to “host,” it means that the container shares the network namespace with the host system.volumes: it maps the local directory./folder/media2to the container directory/media2. The:roat the end specifies that the volume is mounted in read-only mode.restart: it’s set to'unless-stopped'.This is a common policy for services that should always run and recover from failures.environment: This section allows you to set environment variables for the container. In our example, it sets theJELLYFIN_PublishedServerUrlenvironment variable tohttp://example.com. Environment variables are often used to configure applications within the container.extra_hosts: This section allows you to add entries to the container’s/etc/hostsfile. In our snippet, it adds an entry that maps"host.docker.internal"to"host-gateway". This can be useful for resolving hostnames or making the container aware of other services running on the host system.
Set up a server
- Nfs
I would like all my friends to upload their music, NFS (Network File System) is a mechanism for storing files on a network. As our music volumes are set to a folder we can share it so that they can upload their files. Another option is to create another user and allow them to upload.
/home/nfsshare 10.0.0.0/24(rw,no_root_squash)
Access your music
Create an account for all your friends
Finally
Empower your music collection and listening experience.
I love Open Source.
Automate Your Blog Posts with GitHub Actions
Streamlining Your Blogging Workflow
Introduction
As a passionate blogger who loves both writing and maintaining a blog on GitHub Pages, you know that managing your blog can be a rewarding yet time-consuming endeavor. The good news is that you can streamline your blogging workflow and save precious time through automation using GitHub Actions. In this article, we'll explore how to automate your blog post deployment on GitHub Pages, making your blogging journey smoother and more efficient.
I. Requirements
Before we dive into automating your blog posts, let’s ensure you have the necessary tools and prerequisites in place:
GitHub Pages Blog: You should already have a blog hosted on GitHub Pages. If you don't, you can set up a GitHub Pages repository to get started.

Jekyll: If your blog is built with Jekyll, make sure it's properly set up. Jekyll is a popular static site generator that works seamlessly with GitHub Pages.

Node.js: Node.js is a JavaScript runtime that will allow us to write custom scripts for automation. Ensure you have Node.js installed on your local machine.

GitHub Actions: Familiarize yourself with GitHub Actions, which is the automation and CI/CD platform provided by GitHub. It enables you to create custom workflows for your repositories.
Writing a Node.js Script
To automate your blog post deployment, you can create a Node.js script that gets lastest post of your blog. Here’s a simple script as an example:
import fs from 'fs/promises';
import Parser from 'rss-parser';
const parser = new Parser();

try {
  const { items } = await parser.parseURL('https://libialany.github.io/feed.xml');
  let updates = `<!-- start latest posts -->\n`;
  for (let i = 0; i < 3; i++) {
    const { link, title } = items[i];
    const row = `- [${title}](${'https://libialany.github.io/'+link.slice(0,-5)})\n`;
    updates = updates.concat(row);
  }
  updates = updates.concat('<!-- end latest posts -->');
  const currentText = await fs.readFile('README.md', 'utf8');
  const postsSection = /<!-- start latest posts -->[\s\S]*<!-- end latest posts -->/g;
  const newText = currentText.replace(postsSection, updates)
  await fs.writeFile('README.md', newText);
} catch (error) {
  console.error('there was an error:', error.message);
}
This script builds your Jekyll site, performs optional optimizations, and deploys it to GitHub Pages.
Writing a Workflow YAML File
To automate the execution of the script whenever you make changes to your blog, you can create a GitHub Actions workflow. Create a .github/workflows/deploy.yml file in your repository with the following content:
name: Build README

on:
  workflow_dispatch:
  repository_dispatch:
    types: [scrape]

jobs:
  build:
    runs-on: ubuntu-latest

    steps:
      - name: Check out repo
        uses: actions/checkout@v3
      - name: Use Node
        uses: actions/setup-node@v3
        with:
          node-version: "18.x"
      - name: Install node dependencies
        run: npm install
      - name: Check for RSS feed updates
        run: npm run scrape
      - name: Commit and push
        run: |-
        ... more code
This YAML file defines a GitHub Actions workflow that runs whenever you push changes to the main branch. It sets up Node.js, installs dependencies, and executes your Node.js script.
Interesting Applications of GitHub Actions
-Continuous Integration (CI): Automate testing and validation of your blog’s code to ensure it’s error-free before deployment.
-Scheduled Posts: Use GitHub Actions to schedule and automate the publishing of blog posts at specific times or dates.
-Backup and Recovery: Create automated workflows that back up your blog’s content and settings regularly, making it easier to recover from any accidental data loss.
-Notify Subscribers: Automatically send notifications to your subscribers or social media followers whenever you publish a new blog post.
-Security Scans: Use GitHub Actions to scan your blog for security vulnerabilities and receive alerts or automatic fixes for potential issues.
RDS EC2
Dummy steps in AWS
getting devops experiences..👀
Intro
Firstly a simple Set Up.
Requirements
1. Ec2
2. Rds.
Steps
Ec2
We need the port app is available, so in security groups add a rule.
Rds
there is only a rule an change that.
Project
with git clone you can hav your project in your ec2.
Conection
You need to change the credentials of your database connection.
localhost: ">your endpoint rds<"
...... more credentials
To work comfortably with the database:
make a ssh tunelling to get GUI.
EXTRA
…. next moment
Cloud And Alarms
Scaling by CloudWatch Alarms
Dedicated to all beginners very curious because you will have .many doubts at the end. sincerely lib
Previous requirements
- AWS Coung
- Ec2
- CloudWatch
SQS
why we use SQS?
Because is a message service queue.
Steps
Create traffic request for an instance
Create scale-out and scale-in alarms using SQS
Go to CloudWatch> Alarms>Create alarm
The metric to choose is: ApproximateNumberOfMessagesVisible metric.
Settings are:
scale-in to get activated
Conditions: Greater 500 messages but it has to check every minute.
scale-out to get activated
Conditions: Lower 400 messages but it has to check every minute.
Observe the Auto Scaling Group’s
Create Autoscalings Groups
Go to EC2>Auto Scaling Groups>EC2 Autoscaling Group.
Type is: Simple Scaling Scaling Policy Name : Scale In/out# you have to choose one
Take action: Add/remove 1 instance and then wait 60 seconds # you have to choose one
You need to create 2 Auto Scaling Group’s.
Conclusion
Improve a service app by setting alarms and policies.
Next Lab: Creating an Auto Scaling Group and Application Load Balancer in AWS
🤪
Learnig Something About OpenSSL
Exploring Certificates
Sector Researcher es algo rebuscado que se me aparecio. 👀
Intro
Este post va enfocado a conocer un poco de como funciona la seguridad en windows a nivel de executables.
Marco Teorico
Como Windows podria detectar que un programa es sospechoso
Resumen Express
IBM Says
SAP (Software, Application and Product) en windows debe tener un digital certificate.
Un usuario deberia percatarse de esto mediante:
1) Su conocimiento de instalacion de algun Software(Programa .exe .dll).
2) Certificado de un Trusted Publishers certificate store.
*) La firma digital se puede ver desde la pestaña Firma digital de Propiedades del archivo firmado(.exe).
Sign Executable Files and Why It’s Important
El certificado firmado de un codigo utiliza un hash criptografico que valida la integridad del archivo ejecutable.
Los CA pueden ser DigiCert o Sectigo.
No puede ser un Publisher de confianza sin un certificado.
Demo
Signing Executables Files
…. < This will continue >
Mejoras
Este es un post que trata un nivel basico de Signing Executables Files(Archivos Ejecutables Firmados).
Links
IBM Says 😁.
How to Digitally Sign Executable Files and Why It’s Important .
EXTRA
Dont trust in win… 🔥,thanks.
Networking en Linux
Comandos Basicos
Algo importante en S.0. Linux en este caso debian es conocer de los comandos de configuracion Networking.
Prerequisitos
tener instalado vim o algun editor de texto.
sudo apt install vim
para verificar:
which vim
Intro
Primero en esta parte veremos los comandos y despues los pondremos en practica en un proyecto:
Estructura
|-> proyecto --> config.txt
Conceptos
🐑🐑 necesitamos cambiar alguna direccion IP de nuestras interfaces ipconfig
Listamos
ifconfig
Cambiar la IP de nuestra interfaz ,el network mask y el maximum transmition unit(unit). _root user_
ifconfig enp0s3 10.0.2.20
ifconfig enp0s3 network 255.255.255.0
🐑🐑 adicionar un estatico route ??ip
_root user_
ip route add {NETWORK/MASK} via {GATEWAYIP}
🐑🐑 necesito informacion de la configuracion SCO TCP/IP kernel routing table.
_root user_
kernel routing table
🐑🐑 necesito informacion de la tabla de rutas route -n.
_root user_
route -n
EXTRA
Nota es importante conocer el estado y configuracion de las tablas de rutas IP ,nos indican como y a traves de donde se envia un paquete en las distintas redes 👀,thanks. segunda parte el proyecto.
PortScanner en Go
Learning Go By Doing
Vamos aprender un poco de Go enfocandonos en la Capa 4 del modelo TCP/IP y el cual entra en esa categoria un Port Scanner.El S.O que estoy usando es Fedora. 👀
Intro
Como este proyecto se va enfocado a la capa 4,se me toparon nuevos conceptos importantes y relevantes, tratare de resumirlos ,creo que fueron los suficiente para entender como estaba funcionando todo.
Teoria
Debemos saber que es el Protocolo tcp
net.DialTimeout("tcp",....)
//more code
El protocolo TCP de la capa de trasporte nos confirma que un paquete ha alcanzado su destino ,este ha estableciendo una conexión de punto a punto entre los hosts de envío y recepción.
Goroutines
Un goroutine es una función que es capaz de ejecutarse simultáneamente con otras funciones.
go es la invocacion a una funcion,algo importante ,debe ejecutarse una funcion para que una goroutina responda o se ejecute.
func hello(s string){
	fmt.Println(s)
}
func main(){
	go hello("1")
	//Para que funcione
	//(1) ejecutas la funcion hello
	//hello("2")
	//(2) ejecutas la funcion Sleep
 	//time.Sleep(time.Millisecond*200)
Analogia
Cocinar lo primero el agua hirviendo.
Despues vas agregando la papa, el arroz estarian siendo cocidas al mismo tiempo.
Channel
Los canales son medio de comunicacion entre una goroutina y un programa principal.
Gracias a esperar una respuesta o a comunicarse, podemos limitar un canal (decirle que no se pase de una cantidad).
Analogia
El Agua si esta hirviendo a gran temperatura empezara a crear vapor o sonido es un medio que nos informa.
// Creas un canal
sem:= make(chan bool, 10)
	for i := 0; i < 100; i++ {
		// le fijas un valor
		sem <- true
		go func(i int){
			defer wg.Done()
			// la goroutina le comunica al canal
			defer func() { <-sem }()
			//more code
		}(i)
//more code
Un canal puede ser varios tipos:int,string ,struct,etc.Debes inicializarle un valor.En Go si tienes una variable debes usarla por eso si tienes un canal debes devolverlo con valores no puedes abrirlo y dejarlo.
Sync
La Sincronizacion ,cuando ejecutamos una goroutina no esperamos a que acabe , si usamo sync la libreria podemos asegurar que nuestras goroutines acaben.
Son 4 palabras clave son un ciclo no pueden ser omitidas.
	// crea un sync
	var wg sync.WaitGroup
	// adicionas una goroutina
	wg.Add(1)
	go func(){
			// more code
			// restas una goroutina
			wg.Done()
		}()
	}
	// acabas  con el sync por que deberi tener valor de 0
	wg.Wait()
Analogia
Para asegurarnos de no quemar o falta de coccion de nuestro comida podemos poner un timer(alarma).
PortScanner
Prerequisitos
- Golang instalado.
Pasos
1. Lo primero es ingresa una IP
2. Tratar de conectarte por tcp con un puerto x (65535>x>1).
3. Manejar las respuestas.
Ejecucion
clonas el repo
git clone [URL]
dentro del directorio
|-> README.md
|-> main.go
lo inicializas.
go mod init main.go
lo ejecutas con
go run main.go -ip [IP]
Scanear tu propio localhost
go run main.go
Mejoras
Cree un script enfocado a resolver el dns para asi tener una funcionalidad mas pero el Codigo debe ser mas estructurado ,debo mejorarlo con Programacion Orientada a Objetos.
Un PortScanner Sincrono 😁.
si quieres el portscanner .
EXTRA
Lear by doing 🔥,thanks.
Makefile y Docker
Conociendo un poco de makefile
Vamos aprender un poco mas sobre archivos makefile.El S.O que estoy usando es Fedora. 👀
Intro
El uso de un makefile nos puede ayudar en el caso de actualizaciones de versiones de archivos,por que los makefiles tienen tasks(tareas o comandos) que deseas ejecutar.
make es el comando, el makefile es el archivo que se ejecutara.
make ....
Ejemplo
Makefile para Docker
Prerequisitos
Tener docker y docker-compose instalado.
Estructura
Vamos a cambiar la version de la imagen a descargar de alpine y señalaremos el path del archivo.
Estructura
|-> Makefile
|-> v1       --> clean.sh
|-> Dockerfile
1. Makefile es donde pondremos las instrucciones para el contenedor.
2. El Dockerfile va a copiar v1 folder dentro de la imagen .
3. Dockerfile el objetivo es ejecutar un programa (clean.sh)
Setear los argumentos en Dockerfile:
nano Dockerfile
La seccion importante son FROM y ADD.
ARG alp_ver
FROM alpine:$alp_ver
ARG fil_ver
ADD $fil_ver/clean.sh /usr/local/bin/clean.sh
RUN chmod +x /usr/local/bin/clean.sh
ENTRYPOINT ["clean.sh"]
ARG el uso es obligado.
Ahora creamos nuestro Makefile.
- Fijamos nuestras variables.
alpver=3.12
filver=v1
name=${alpver}/${filver}
....more code
- Fijamos nuestra etiqueta de entrada.
build:
- Fijamos nuestro comando.
build:
      @docker build . -t ${name} --build-arg alp_ver=${alpver} --build-arg fil_ver=${filver}
- Antes de la etiqueta debemos poner la bandera .PHONY.
.PHONY: build
fijamos .PHONY ,si hay un file llamado build y ejecutamos make build no va ejecutar , para evitar que el make comando se confunda, se utiliza .PHONY.
alpver=3.12
filver=v1
name=${alpver}/${filver}

.PHONY: help build push all
help:
	@echo "Makefile arguments:"
	@echo "alpver - Alpine Version"
	@echo "filver - File Version"
	@echo "Makefile commands:"
	@echo "build"
	@echo "all"
.DEFAULT_GOAL := all
build:
	@docker build . -t ${name} --build-arg alp_ver=${alpver} --build-arg fil_ver=${filver}
all: build push
0_o el help para recordar,ayuda.
por ultimo.
make build
si quieres el Dockerfile .
EXTRA
nota es importante saber algo de makefile 🔥,thanks.
Load Balancer con Nginx y Docker
Conociendo un poco de Nginx
Vamos aprender un poco mas sobre Nginx.El S.O que estoy usando es Fedora.
Prerequisitos
tener instalado docker puedes ir al sitio de Docker donde ellos te guian como instalar. tener instalado docker-compose.
sudo dfn install docker-compose
para verificar:
which docker-compose
:| puedes omitir dfn por apt,etc.
Estructura
El plan a seguir es configurar nginx para que balancee la carga entre 2 aplicaciones.
Estructura
|-> app1 --> Dockerfile
|        --> app1.py
|-> app2 --> Dockerfile
|        --> app2.py
|-> nginx--> default.conf
|        --> nginx.conf
| docker-compose.yml
1. app1/Dockerfile construye la aplicacion app1.py
2. app2/Dockerfile construye la aplicacion app2.py
3. Ahora si explicamos la configuracion de Nginx
nano nginx/default.conf
la seccion importante son upstream y proxy_pass.
upstream loadbalancer {
server 172.17.0.1:5001 weight=6;
server 172.17.0.1:5002 weight=4;
}
server {
location / {
proxy_pass http://loadbalancer;
}}
upstream significa que todas las solicitudes de http://loadbalancer van a cualquiera de los servidores : : :172.17.0.1 en el puerto 5001 (es la app1 ), 172.17.0.1 en el puerto 5002 (es la app2). weight proporcion de trafico que debe dirigirse a cada servidor.
sudo nano /etc/nginx/nginx.conf
ahora configuramos dentro de la etiqueta http{}.
events {
# todo el codigo normal
}
http{
   #todo el codigo
   #ponlo al final
   server_tokens off;
}
off-topic :server_tokens para ocultar la version de Nginx que usas.
0_o la ip 172.27.0.1 es el gateway de la red bridge asignada por default ,tambien lo puedes ver en tu maquina:
ip a | grep docker0
mas sobre networking en docker 😁.
4. **docker-compose.yml**, en el contenedor de nginx solo le pasaremos nuestro archivos por volumenes
😅.
  nginx:
    image: nginx:latest
    container_name: webserver
    ports:
      - 80:80
    volumes:
      - ./nginx/nginx.conf:/etc/nginx/nginx.conf
      - ./nginx/default.conf:/etc/nginx/conf.d/default.conf
    depends_on:
      - app1
      - app2
esto es solo un fragmento del docker-compose.yml , si quieres todo mas del codigo de este mini-tutorial.
Por ultimo ,levantemos todo nuestros contenedores.
docker-compose up
verificar entrando a…
curl localhost #verificamos
EXTRA
nota es importante conocer de networking con docker 👀,thanks.
Bloqueo de Ip con NGINX basado en el Codigo de Pais
Conociendo un poco del modulo mod-http-geoip.conf
Vamos aprender un poco mas sobre Nginx,parte por parte,el Sitema Operativo que estoy utilizando es Ubuntu 20.0.
Prerequisitos
tener instalado nginx.
apt install nginx
para verificar:
which nginx
instalar el modulo geoip.
sudo apt install libnginx-mod-http-geoip geoip-database
para verificar si el modulo se ha instalado .
ls /etc/nginx/modules-enabled/
Configuracion
- El primer archivo a modificar es /etc/nginx/nginx.conf, si husmeaste alguna vez todo el archivo veras que se llaman otros files como sites-enabled , sites-available ,etc .Por lo tanto es lo mismo si realizas la configuracion en este file o lo realizas en los demas como el default.
sudo nano /etc/nginx/nginx.conf
ahora configuramos dentro de la etiqueta http{}.
http{
   #todo el codigo
   #ponlo al final
   geoip_country /usr/share/GeoIP/GeoIP.dat;
    map $geoip_country_code $allowed_country {
        default yes;
        AO no;
   }
}
default yes = todos estaran permitidos, AO (Angola) no = es el pais que no estara admitido, en otro caso default no = nadie esta permitido, AO (Angola) yes = el unico pais admitido, 0_o puedes poner mas paises si deseas te dejo la lista de codigos.
- El segundo archivo es /etc/nginx/sites-available/default ,donde establecemos la condicional que admite o rechaza la ip.
sudo nano /etc/nginx/sites-available/default
dentro de la seccion de location /{}.
location / {
  #codigo
  if ($allowed_country = no){
    return 444;
  }
}
ahora reenviara un mensaje de 444 ,A 444 No Response error indica que el server ha cerrado la coneccion y no retorna informacion a la request del cliente.
- Reiniciar Nginx.
antes de reiniciar verifica que no tengas fallas de sintaxis.
nginx -t
reinicia el servicio de nginx.
sudo systemctl restart nginx
Por ultimo puedes verificar entrando a la pagina.
EXTRA
acerca de los modulos son realizados para la distribucion debian 👀.
Photo by Bogdan Feldiorean on Unsplash